Friday, February 18, 2011

Working on the bikes vocal chords!

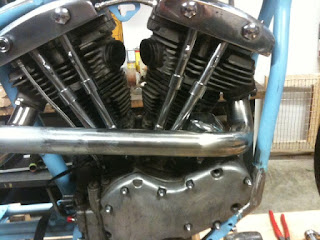
I've always loved the look of rippled pipe, and yeah it may be overused at times, but I had to have a little touch of it.  Pieced together these pipes from 3 old beat up sets of exhaust I had laying around.  Capped them off with sum BUB reverse cones.  Cant wait to see them chromed!


 Threw on a seat I've been holding onto and the original Paughco Alien dual cap tank just to see how everything is flowing.  Digging it!

Pan/Shovel update

As stated in previous posts; my goal is to build my idea of a killer bike while keeping the spending down!  Well, one way to do this is to turn other's trash into treasures.  In the same way that the early wishbone frame was crying out for help; well so was this early oem Horseshoe oil tank.  Not sure how this crack came about, but it needed help nonetheless.  The crack ran across the top seam as well, so I had to start by grinding out some of it, and then using a shaping hammer, I got everything to line back up as it should.  Buttoned it all up with teh TIG, and now it's ready to ride the ride again.


Some new paint -

El Diablo Run helmet to be given away to the winner of the Circulo De Muerte!  Check out more at http://www.eldiablorun.blogspot.com/

100% original design on this one - "Hard Luck" soon to be a series of designs.

And next, some simple variegated leaf with Black accent striping.

Friday, February 11, 2011

Finished up the frame -

for now anyway.  Filled in the obvious void left from hacking off the sidecar hoops. So I am sitting here at a standstill, and figured I would mock this thing up and see if it matched the image in my head.  So far so good!  Nothing's really bolted down, just set in place; but man I'm diggin it!  Whatdaya think?


Friday, February 4, 2011

Frame repair....

The first order of business was straightening the backbone, which I accomplished with a little heat and persuasion.  Next was to tackle the neck.  As you will see in the picture below, someone along the way hacked this thing up pretty good.  Oddly though, instead of following the norm and taking a pie slice out of the bottom support and kicking the neck outward to gain the desired rake; this genius took a pie slice out of the top of the neck casting/backbone and pulled the neck back.  I have never seen it done this way.
So the choice was made to dive in and get this thing sitting right!  I started with a cut right down the back side of the neck itself.  After shelling the teeth off of 3 sawzall blades, and burning through a few cutoff wheels, I was ready to add a little heat and start bending this thing back into it's natural resting place.  The original welds may not have been pretty, but they were definitely solid!
Next, I had to make a template of the gaping void that I was now left with.  Once I had the template then I came up with the 2 pieces you see in the next photo.  Combined as one, they filled this void perfectly and gave me some solid support to tie things back together.

Once fitted in place I fired up the Lincoln, and sewed it all back together.  After the root pass secured everything for the road, I layed down a few more passes to help with blending and molding later.

Wednesday, February 2, 2011

1964 Pan/Shovel Build

Okay, I have thrown together a few bikes in the past and each consisted of a plan to: build, sell, re-invest, repeat.  Or something like that.  I am finally at a point where I am setting out to build a bike for myself; something that I want to ride.  All the while trying to prove to the world that you can have one helluva bike even with a limited budget.  So with that being said, I am going to attempt to chronicle this build thoroughly here on this blog.  So let's get to it.
  In my eyes, there's not much that beats the look of a slabside shovel, so when i came across this 64 panhead with a shovelhead topend I had to pick it up.
The next thing on the list was the frame.  I had my hopes set on a straight leg frame but seems that someone else had another plan because along came a 48 wishbone that had the right numbers on the price tag.  It needed quite a bit of help, but was definitely worth resurrecting.

I will go over the repairs I chose to make to the frame on the next update.  Stay tuned!